SIGNL4 Integration with Microsoft Sentinel
SIGNL4 provides a powerful 2-integration with Microsoft Sentinel and other Microsoft products supporting the Microsoft Graph security API, like Microsoft Defender XDR, Microsoft Defender for Cloud, or Microsoft Defender for Endpoint. It allows to retrieve incidents and to respond to them e.g. via the SIGNL4 mobile app. This includes but is not limited to status updates and adding notes to an incident.
Feature overview
- Forwarding incidents of your choice (status filtering possible) to SIGNL4
- Ability to augment retrieved events with search result data from the related security alerts of the underlaying log analytics workspace
- Tagging retrieved incidents with a tag of your choice
- Owner assignment when Signl is acknowledged and or closed
- Incidents notes on status changes in SIGNL4 or when users add annotations in SIGNL4
- User friendly display of linked items (e.g. products or company names)
- Configure the resolution classification and the classification comment which is passed along when closing an incident from SIGNL4
- Configure the states of incidents in Sentinel that should be pulled (not only New)
The SIGNL4 connector for Microsoft Sentinel does not only retrieve the incidents but also the linked alerts. These alerts then become part of the SIGNL4 alert and contain essential technical information about the issue. This helps the engeneer to understand and resolve the incident.
Learn more about the integration in the following video:
How does it work?
SIGNL4 Integration with Microsoft Sentinel – Manual Azure Setup Guide
Purpose
This guide creates a dedicated Microsoft Entra app registration and service principal that SIGNL4 uses to read and update Microsoft Sentinel incidents and access the linked Log Analytics workspace. It follows the principle of least privilege where possible while ensuring SIGNL4 can update/acknowledge incidents.
Prerequisites
- Global Administrator (or equivalent) rights in Microsoft Entra ID.
- Owner or User Access Administrator rights on the Azure subscription (or relevant resource group) containing Microsoft Sentinel.
Step 1: Register the Application in Microsoft Entra ID
- Go to the Microsoft Entra admin center → Identity → Applications → App registrations.
- Click + New registration.
- Enter:
- Name:
AzureSentinel and LogAnalytics Client for SIGNL4 - Supported account types: Accounts in this organizational directory only (Single tenant).
- Name:
- Click Register.
- On the Overview page, copy and securely save:
- Application (client) ID
- Directory (tenant) ID
Step 2: Create a Client Secret
- In the app registration, navigate to Certificates & secrets → Client secrets tab.
- Click + New client secret.
- Add a description (e.g.,
SIGNL4 Sentinel Connector). - Set the desired expiration (12–24 months recommended).
- Click Add.
- Immediately copy the secret Value and store it securely. You will not see it again.
Step 3: Create a Custom RBAC Role (Using JSON for Precise Permissions)
The SIGNL4 connector can run KQL queries that may be part of the alerts which are linked to a retrieved incident. The search result may be meaningful for you in your incident response activities. If you want to use that augmentation, follow the below steps. Otherwise you can proceed directly to step 4.
- Go to the Azure portal → open your Subscription.
- In the left menu, select Access control (IAM) → Roles tab → click + Create.
- On the Basics tab:
- Custom role name:
SIGNL4 Sentinel and Log Analytics Access - Description (optional but recommended):
Custom role for SIGNL4 to read and update Sentinel incidents and query Log Analytics
- Custom role name:
- Click Next to go to the Permissions tab.
- Skip the permissions selection UI.
- Navigate to the JSON tab.
- Click the Edit button to edit the JSON definition of the role.
- Replace the entire
"permissions"object (the array) with the following template:
"permissions": [
    {
        "actions": [
            "Microsoft.OperationalInsights/workspaces/query/read",
            "Microsoft.OperationalInsights/workspaces/query/*/read",
            "Microsoft.OperationalInsights/workspaces/read"
        ],
        "notActions": [
            "Microsoft.Authorization/*/Delete",
            "Microsoft.Authorization/*/Write",
            "Microsoft.Authorization/elevateAccess/Action",
            "Microsoft.Blueprint/blueprintAssignments/write",
            "Microsoft.Blueprint/blueprintAssignments/delete"
        ],
        "dataActions": [],
        "notDataActions": []
    }
]
- Click Save, then Next.
- On the Assignable scopes tab, ensure your subscription (or the specific resource group containing Sentinel) is selected.
- Click Review + create → Create.
Note: This custom role provides the necessary Log Analytics query access. Additional Sentinel-specific permissions are granted via built-in roles in the next step.
Step 4: Assign Roles to the SIGNL4 Service Principal
You will assign three roles to the application (service principal) which you have created in step 1:
- In Azure, open the Log Analytics Workspace of your Sentinel deployment, then click → Access control (IAM) → click + Add → Add role assignment.
-
Assign the following roles one by one to the application/service principal:
Role 1 – Custom role (Log Analytics access)
- Select the custom role you created in Step 3 (
SIGNL4 Sentinel and Log Analytics Access).
Role 2 – Microsoft Sentinel Contributor (important for updating incidents)
- Select the built-in role Microsoft Sentinel Contributor.
This allows SIGNL4 to read and update incidents (change status, add comments, assign owners, etc.).
Role 3 – Log Analytics Reader
- Select the built-in role Log Analytics Reader.
- Select the custom role you created in Step 3 (
- For each role assignment:
- On the Members tab, choose User, group, or service principal.
- Search for and select your app:
AzureSentinel and LogAnalytics Client for SIGNL4. - Click Review + assign.
Note: The Sentinel Contributor role 2 is required for the SIGNL4 connector to access the Sentinel API and read/update incidents. Role 1 is especially required if you want the SIGNL4 connector to augment alerts, which are part of an incident, with search results of the corresponding KQL query that created the alert. This behaviour can be enabled and disabled in the SIGNL4 connector configuration. If you don’t want to use that augmentation, you may only assign the built-in Azure roles 2 and 3.
Step 5: (Optional) Microsoft Graph API Permissions
If SIGNL4 needs to pull additional security alerts directly from Microsoft Graph (e.g., Defender alerts):
- Go back to the app registration in Entra admin center → API permissions.
- Add Microsoft Graph → Application permissions:
SecurityAlerts.Read.AllSecurityEvents.Read.All(if needed)
- Click Grant admin consent for [your tenant].
Step 6: Provide Credentials to SIGNL4
Supply the following to the SIGNL4 Azure Sentinel connector:
- Tenant ID (Directory ID)
- Subscription ID
- Client ID (Application ID)
- Client Secret
Verification:
- Check Role assignments in the subscription to confirm the three roles are assigned to the app.
- In Entra ID, verify the app registration and client secret.
Security Best Practices:
- Rotate the client secret regularly.
- Monitor sign-in logs for this service principal.
- Review role assignments periodically.
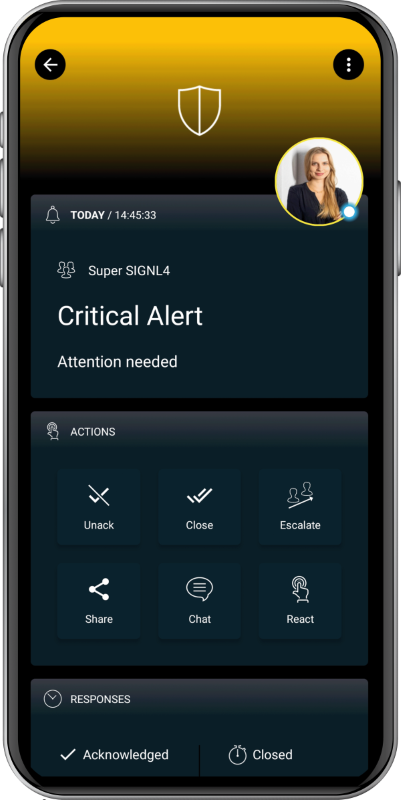
The alert in SIGNL4 might look like this.